"Take my
advice - I'm not using it"
Peter Lundt
Index: (click on the article you seek and it should jump there. Or just
scroll and browse)
How To Make Your Bottom Pretty
Alscore scoring program
Buying a Used Laser by
Allan Broadribb
Mast step repair photos
Outside Winter Storage in Snow
Laser Tuning Chart
What's My Serial Number? / Sail Number? / Year
Built??
New November 2008 Laser and Sunfish Foils repairs page
Removing Old Paint
From My Boat
Boatyard Tools Explained
Repairing the Bailer
Rebuilding an Old
Laser by Allan Broadribb
Straightening a Bent
Centerboard or Rudder
Fred's Rigging Photos
Outside Winter Storage??
| Photos taken in Union City, PA in February 1976.
There are two boats. Green and black poles are the 5 foot tall mast
supports on the front of the trailers. |
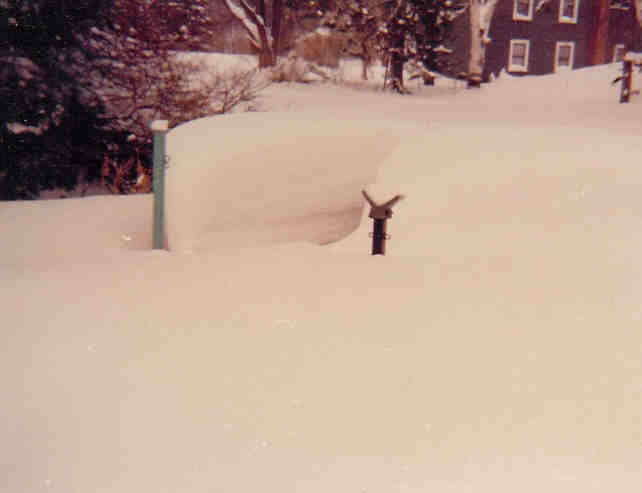 |
It is important to support your boat properly if it is to
hold this load for many months |
| The boats in the photo
were stored safely and they sustained no damage whatsoever. The key
considerations are proper support and the expansion of water as it turns
to ice. I will address the ice concern first.
Snow or rain will fall throughout the winter
in most of North America. Neither the rain or the snow will damage
the gelcoat or boat structure. The damage comes from freezing and
thawing and .... worst of all freezing again. There is probably
nothing more damaging that ice and water can do to your boat than those
damages made by expansion in confined spaces.
If your mast step fills with water and
freezes, the expansion may stretch and crack the mast tube. If the
ice partially thaws and water gathers between the solid ice chunk and the
walls of the step, re- freezing can be disastrous. Considering that
in a typical winter your boat could experience freezing and thawing as
many as 100 times, you must be careful not to allow water to gather inside
any confined space.
We covered the mast steps with a couple fancy
plywood devices that looked the roof of a little birdhouse. The
underside had a rubber fitting that sealed the top of the mast step
tube.
The trailers supported the boats by the
gunwales. For winter storage we added a couple extra gunwale supports on
each side of the boats. The extras were simply "U" shaped
devices made from three pieces of 2 X 6 lumber. They sat on the
trailer and helped spread the load.
The cockpit was covered with another piece of
plywood that sat on 2 X 4s laid across the boat. We also placed wood
blocks under the axles so that the tires would not be sitting stressed in
one place for an entire winter.
In 1979 I finally learned that this was a
really stupid thing to do with a boat for the entire winter. I moved
to Austin and I rarely store my boat for an entire week without using it
at least once. I have found lots of time to sail during the
"winter" because I can drive my car out of the garage without
first spending an hour or more shoveling snow out of the way.
Maintenance Page Index |
Buying a Used Laser by
Allan Broadribb
If I'd had a hundred used boats this past summer, I'd have sold them all, easily. There's
a big demand for used boats and, it seems, a small supply.
I guess the reason for the demand is quite simple, you can get a competitive Laser with a
good sail for half the price of a new one and interestingly enough, the value of a used
boat in good shape seems to have more to do with the cost of a new boat than what the
owner originally paid for it.
Having had so many calls about used boats I've developed some guidelines, here they are:
THE SERIAL NUMBER:
Check the transom of the boat for the serial number, it'll look something like this! PFS
800000779
The first three characters denote the builder as follows. This is from memory but it's
fairly accurate:
PFS - Performance Sailcraft in Montreal. Boats built from about 1971-82
ZFS - Performance Sailcraft in Montreal after they went bankrupt and refinanced. Boats
built from about 1982-85.
ZID - Performance Sailcraft in Hawkesbury, Ontario, after they went bankrupt and
refinanced again. Boats built from about 1985-89.
PSB - Pearson Small Boats, Portsmouth, Rhode Island, after another bankruptcy by
Performance Sailcraft. Boats built from about 1989-91.
SLI - Sunfish Laser Inc., Portsmouth, Rhode Island, after Pearson Yachts and Pearson Small
Boats declared bankruptcy. Boats built from about June 1991 - March 1997.
OQT - Vanguard Sailboats Inc., Portsmouth, Rhode Island took over
building Lasers and Sunfish from Sunfish Laser.
The next five characters are the sail number, in this case 80000, which was my first
Laser. If the first character is a letter than the sail number is over 100,000. A=10,
B=11, C=12, etc. followed by the next four numbers.
The last four characters denote the month and year the boat was built.
So now you know how to tell who built the boat, the real sail number and when it was
built.
Maintenance Page Index
THE HULL
Check the obvious. Is it clean? Has it been looked after? A 10 year old boat that has had
covers put on it all the time will probably be in better shape than a 4 year old boat left
out in the sun all day in Florida.
Check the stiffness of the deck, especially the area where you sit to hike and the bottom
of the cockpit. Do this by pushing on the deck with both palms side by side. If it moves
you'll know it's soft. The deck is a sandwich of foam between fiberglass with gel coat on
the top. When it's all stuck together this is really stiff but the fiberglass can
delaminate from the foam, which is the reason it will move.
If you want a demonstration of "soft", go down to your club and find some of
those old boats that have been on the racks for donkeys years, you'll find one of them
which will give you a good demonstration.
Check for water in the hull by opening the transom drain
plug and
lifting the bow. Absence of water doesn't mean it doesn't leak, but if water gushes out
you might want to know why. It's tough to check for leaks unless you can sail the boat. Of
course if the owner will let you take the boat for a sail then go for it.
Leaks can usually be fixed easily enough. Run some epoxy around the deck/hull joint. Pull
all the screws in the boat with an electric screwdriver then put them all back with
silicone. If they are stripped out then through bolt the fittings. Check the cockpit
drain plug area, you have to pull out the bailer to do this. Take out the brass tube,
silicone the joint and put it back. Check the joint between the hull and check at the top
of the centerboard slot. You'll have to epoxy this if you think it leaks as silicone will
cause friction with the board.
The mast step can be a problem area. If it has been replaced then
that's OK, it's probably stronger than new. If not and the bottom looks worn then you
might want to put an inspection port in to reinforce the bottom of the tube where it meets
the hull. To do this you chip out the original glue, sand off the shiny resin and then
make a strong joint with fiberglass.
Your hull should weight about 130 pounds. Don't necessarily look for
a light boat, you are sacrificing stiffness and durability for an insignificant gain in
speed. However you probably don't want a 150 lb Laser.
If you're going to race, check the mast rake. Put the bottom section
(make sure it's not bent) in the mast step. Hook the end of your tape on the back of the
top of the top section and measure to the center of the transom. It should be around 12'-6
1/2". Now, you have to understand that the mast rake is hearsay, the manufacturer's
technical specification is not published. There are probably boats which are different and
go fast. Check the mast rake especially if the mast step has been replaced.
THE SPARS
It's critical that the bottom and top sections of the mast are straight. (The only
exception is the 4.7 rig which has a pre-bent bottom section.) Roll the top section on a
flat surface to see if it has a slight bend at the collar. It's nice if the boom is
straight, but it'll probably have a slight downward bend in it at the vang key. Don't
worry about loose fittings too much, you can always rivet those back on or
through bolt
them. Replace plastic clam cleats with aluminum.
CENTERBOARD & RUDDER
Check that the blades are straight with no chunks missing from them. If the tiller is made
of wood you can always buy a new one.
SAIL
Make sure the sail has the red Laser patch near the clew, if not
it's not legal for racing and you'll have to buy a new one. If it's a rag you'll have to
buy one anyway if you plan to race.
OTHER STUFF
If the lines aren't too great than you'll probably need to replace them. Try one of our
advertisers for a line kit. If you race then you'll need a bailer and decent tiller and
extension. You should also get an anti friction plate to drop in the mast step. Ask about
the race record for the boat, it might help, but take into account who sailed it!!!
THE PRICE
You're happy with the boat. I can't tell you what to pay for it as prices seem to vary
across the country. I do think you should be able to get out racing in a reasonably
equipped competitive Laser for about half the cost of a new boat. Used boats which have
been taken in exchange by Laser dealers usually cost more than Lasers purchased privately,
but on the other hand the dealers will usually put the boat in good shape and back the
product to a certain extent afterward.
When deciding on price take into account whether you'll have to buy a new sail, line kit,
tiller, bailer, etc.. Also take into account the extras that come with the boat like a
carry all bag, top and bottom cover, spare sail, trailer, dolly, etc... Check the prices
of all these items in the ads in this newsletter to get a general idea of what they are
worth. Oops! I nearly forgot, you might need a mainsheet ratchet block and cleats!
WHERE ARE THEY?
Check the classified ads in the Laser
Sailor for something near you. Check your daily newspaper. Check the notice board at your
club. Check with your local Laser dealer. Last year at the Midwinters in Sarasota I wrote
to all the Laser owners in the club to see if they would charter their boats. Ten said
yes, three of them told me they'd be interested in selling their boats, I didn't even have
to ask. All three were sold. So head down to your local club and get a list of owners and
you're on your way!
RECYCLE YOUR BOAT
You've got a Laser sitting on the rack and don't use it. Why not recycle it? There are
lots of people out there looking for used boats. Give us a call and we'll run it FREE in
The Laser Sailor classified ads, even if you're not a member. You can also have your
district secretary advertise it in the district newsletter, or advertise it in your daily
newspaper. copyright A.Broadribb
Maintenance Page Index
How To Make Your Bottom Pretty
written
by Fred Schroth and edited by half of the people he knows
After my
humbling experiences in recent attempts at racing sailboats, I have decided to write about
the only subject in which I remain at the front of the fleet. If you carefully follow the directions put forth
in this article, you can have the nicest bottom in your fleet.
First, you must
acquire the proper attitude about taking care of your boat.
If you still pull your boat up on a dock without first checking for nails,
screws and gravel, don’t even bother
reading this article. Your Laser only has
about enough gelcoat for two bottom rescue jobs. Don’t do the first one until you are
ready to do whatever it takes to keep from scratching it again. Save the second for the shine that sells the worn
out hull to the next owner. There is nothing
wrong with selling your worn out boat when you buy a new one, but at least save the new
guy a pretty hull.
MATERIALS AND EQUIPMENT:
1. a place to work for about 12 hours that can be
washed down with water
afterwards
2. gelcoat to match your hull and catalyst
3. acetone
4. buffing compound (Dupont 101, Acme 50, 3M Super
Heavy Duty, or a similar
grit)
5. a sharp knife
6. cardboard cut in a bout 10” x 10”
squares
7. stir sticks (popsicle sticks)
8. a bucket and water
9. 12 chunks of terry cloth (cut up old bath towels
into 8 chunks each)
10. wet-sand paper in 320, 400, 500, 600, 800, 1000,
and 1500 grits. If your
scratches are
particularly large or numerous you may also want 180 and
240
grit papers. For whichever grit you use first
you will need about 5
sheets. For the other grits you will need about 1 sheet
each.
11. Gel Gloss or TR 500
12. Maguire's Deep Crystal paste wax
13. a squeegee ( I use a Thalco laminators squeegee
but a good window
squeegee will do
the job)
14. a pencil
15. cleansers (Comet or Ajax)
16. sanding blocks (I use a 9” block from an
automotive paint supplier)
DIRECTIONS:
The boat needs
to be supported upside down at a height where you can stand over it for hours and hours
and hours. You don’t want to damage the
boat or your back.
1) Read all of these directions before you do
anything to your boat. If you don’t
understand the directions, or if you have any trouble making the various steps come out
correctly, take your boat to a professional and get it done right.
2) Wash the boat with a good cleanser and then clean
it again with acetone.
3) Every scratch that you can feel will need to be
filled. Use a sharp knife and lightly
re-gouge the scratches. Your scraping should
create dust, not chunks. You must have a
freshly roughened surface so your repairs can adhere to the grooves.
4) Blow away the dust and wash the boat again with
acetone. Make sure that you have removed
every last particle . If your repairs are
made over a dirty surface the repairs will stick to the dirt but not to your boat.
5) Test the gelcoat to make sure it doesn’t set
up too fast or too slowly by mixing a small amount on your cardboard. Dribble a half dollar size disk of gelcoat off a
stir stick. Then dribble a pea sized amount
of catalyst into the center of the gelcoat and mix it as well as you can. Scrape, wipe, smear and swirl that puddle of
material until you are sure that it is mixed. Play
with the stuff for 15 minutes to make sure
that it isn’t becoming hard too fast--if it sets up too fast you won’t have time
to apply it to the boat. Catalyzed gel coat
can get really hot. Set the cardboard down
somewhere where it can’t start a fire if it ignites. Go away for an hour. When you get back the surface of the puddle should
be sticky but the material underneath should have hardened.
To see if it is hard, fold the cardboard.
The puddle should break. If
your test batch matches this description, you have learned how to mix gelcoat. If the gelcoat didn’t cure, start with
a new batch and either add more catalyst or find a warmer place to do your work.
6) Once you have learned to mix the gelcoat, mix a
fresh batch. Using your stir stick or an
artists brush, paint each of the scratches. Just
try to fill the gouges level with the boat surface. This
may take a couple of passes between which you need to go away for a soda or a beer
depending on your age and preference. Do not
wait more than a couple of hours, period.
7) After you are convinced that all the scratches are
filled, put on one more coat. This last coat
can be mixed with a little extra catalyst to hurry along the process. Gelcoat does not fully cure when it is exposed to
moisture in the air, so this last coat is to help cure the sticky part of the previous
layer. This is a good place to stop for the
night to allow the gelcoat to harden.
8) Fold one of your terry cloth pieces and soak it
with acetone. (It’s nice if your terry
cloth is a contrasting color to the hull.) Wipe
off the part of your gelcoat that will soak easily free.
Keep wiping until the towel shows no more color coming off. If you have lots of scratches this may take a
couple of towels. You will also need a fresh
towel to wash the sticky stuff off your hands.
9) It is time to use sandpaper. Sandpaper can follow the contour or the surface
and remove the softest part, or it can ride gently over the surface, trimming off only the
high spots. YOU MUST FOLLOW
THESE RULES:
Use Sharp Sandpaper!
Do
Not Press Down Hard!
10) It is time to sand off the extra gelcoat. Use sharp sandpaper. Do not press down hard. Ideally, you will use the finest grit that your
patience will allow and a wood block. You
will sand away the excess gelcoat without ever touching the adjacent pristine surface of your boat.
I usually accomplish this task with as tiny a wood block as I can hold and a
lot of brand new sandpaper. The sandpaper
should not touch anything other than your repair until the excess is almost totally
removed. Be patient. Use sharp paper.
Do not press down hard. I
recommend 320 or 240 for this step. Stop
often and look at how you are doing. Remember
that you do not want to sand anything except the stuff sticking out above the scratch. Occasionally you should use your squeegee to dry
the work area. Stop. Look and feel how you are doing.
Let me digress a
moment here. What I just described can be
more easily accomplished using dry sandpaper. I
use the white or gold type of paper. However,
if you choose to sand dry you will be creating a lot of dust and adequate protection is
necessary. You will need a protective mask
and the work area will be coated by your dust. The
advantage of dry sanding is that you can wipe away the dust and see exactly where you have
sanded.
11) When all the repairs are flat and level with the
hull surface it is time to begin working on the whole hull.
Do not begin sanding the whole hull until you have finished sanding all the
individual scratches. You need the shiny
surface of the hull as a reference until the heavy sanding is finished so that you don’t
make the surface wavy.
Now it’s
time to get all the ripples off the entire hull. As
long as you can smell styrene inside your boat the plastic is shrinking, becoming more
crystalline and just plain getting uglier. You want to remove all the tiny ripples that
your boat has developed as the plastic has continued to cure since it left the production
mold. Remember that you are not attempting nor are you allowed to change the shape of your
boat. This is a cosmetic repair, not a speed
enhancement.
I usually start
the whole hull job with 320 paper. Using a
soft rubber block, I sand at 45 degrees to the centerline until the entire hull is a
consistent, dull finish with all of the sanding scratches parallel. The reason to keep all of the scratches parallel
is so that when you switch to another grade of sandpaper, you can sand in a different
direction and know when you have removed all of the scratches from the previous grade.
It’s
graffiti time. Use a pencil to make marks all
over your hull. When Eric Faust does this
part he creates cartoons and other nonsense, but lazy guys like me just scribble. The object is to make enough pencil marks so that
it is easy to tell where you have and have not already sanded. Turn your sanding to the other 45 degree angle and
shift up to your next finer grade of paper. Sand
away all the pencil marks and then inspect your work.
All the sanding scratches should run in the new direction. In areas where the old scratches still show,
pencil and sand again.
Repeat the
penciling and sanding with 400, 500, 600, 800, 1000, 1200 and 1500 grit papers. You can skip grits or stop at a heavier grit but
your boat will not be as shiny if you don’t use the whole series. To make your bottom heavenly, you have to sand the
hell out of it.
12) Now, smear buffing compound all over the hull and
with one of your clean pieces of terry cloth, rub it until
you are sick of rubbing. Rubbing
compounds work a lot like sink cleansers--the more you stroke the surface the better the
final appearance.
13) Using water and a clean rag, rinse off the
remaining compound.
14) Apply Gel Gloss according to the directions on the
can. If you are not paranoid about the
possible loss of boat speed you may also want to wax your boat. When you go to a really important event in fresh
water, you may wish to remove the wax with a strong detergent. I think that a hull coated with Gel Gloss is
faster than a good clean hull in brackish water. I
don’t like to have crud stick to my hull--I think it probably slows my boat down. When sailing in Lake Pontchatrain a J-24 coated
with Gel Gloss will remain clean for a week while boats without Gel Gloss acquire a nasty
yellow coating. Make your own decision.
A final note:
the gelcoat on your hull is only thick enough to endure this process a couple of times. If you aren’t sure that you will take care of
your boat starting immediately, do not waste the repair opportunity now.
Next time you are approaching the starting line you can strike
fear into the competition by having your boat glare at the other sailors.
Maintenance Page Index
Pronunciation
guide: Americanized Schroth rhymes with both. Original German Schroth rhymes
with boat
Feedback report follows:
I used the bottom repair guide from the
Laser FAQ on my 76 Laser for filling and fairing. The whole process was pretty slow, mainly because it was hot out and
I applied a large amount of gelcoat that didn't have enough catalyst.
I had lots of scratches and following the guide the X-acto knife soon didn't have the endurance. I tuned to an engrave made by Dremel and was able to clean up the scratches very quickly. I sent a gelcoat sample to GCP International in Washington for a gelcoat match. The match was very close, the only setback was that it was 94$s for a quart. If it really matters this it the way to go, but if not-- use white. I used an orbital air sander with wet sand 320 grit when I grew tired of hand sanding, and that helped speed things along.
For somebody attempting this project in the future:
Make sue to use PLENTY of catalyst as you will be VERY sorry if the gelcoat sets up too soft.
If you have a fairly sizable project ahead invest in a cheap engraver.
Bondo applicators work well for applying the gelcoat.
Don't use a grit less than 240. You will put fairly sizable scratches in your hull otherwise.
Sharp sandpaper makes the job go much easier.
Use a stiff sanding block or drywall sander to take off the high spots.
And last but CERTAINLY not least- don't try to fill the scratches in one huge heaping load of gelcoat. It is very hard to take off. Use thin layers with plenty of hardener. You will be much happier.
Hope this helps you that plan on filling your scratches.
See you on the course. I will be sailing the blue Laser with no scratches on the hull.
Tim
Maintenance Page Index
_
Removing old Paint question and a long answer
I bought a used Laser and it looks like someone painted the hull at some
time. It is falling off in flakes, looks like crap and is all rough and nasty.
If I
were to use chemical paint stripper would it damage the fiberglass or do I
have to sand the whole thing down before I re-gelcoat the hull? How hard is
it to apply gel coat and get a nice finish?
thanks
Steve
Steve,
Most paint strippers will harm the gelcoat finish on your boat. Even the ones like Pintoff from Interlux are brutal to the plastic. The plastic is attacked a bit
by the chemicals and either remains permanently soft or dries to permanently too
crystalline. I wouldn't use a stripper for those reasons.
But there is more. Toxicity and your one and only birth issued liver is another factor. Sanding dust can be washed off your skin, washed out of your clothing and kept pout of your lungs by a $30 respirator. I always sand instead of ever using chemicals for that reason.
Respirators: Don't waste your life on a cheap respirator. Buy a $30 to $40 mask with filters and make certain that it fits tightly. Hold your palms over the cartridges and suck with all your might. If you can get air the mask is useless. If you can smell stuff while sanding or painting the respirator is useless.
Sniffing paint fumes and eating dist will shorten your life. "What would you pay to be alive for a few extra years," is only part of the question. What would you pay to avoid a miserable and slow death from failing lungs or cancer is the real issue. Wear a really good respirator or be stupid. ( That statement is literal too, because the fumes attack your brain.)
Back to the job at hand>
I like to start out with fine papers and work with the finest grit that my patience will allow. The finer the paper, the longer it will take
to remove the old paint. The finer the paper, the less damage you will do when you inadvertently sand through the paint and scratch the gelcoat.
I usually play around for a couple hours with various grits of sandpaper until I find a grit that actually allows me to remove all the paint in a
reasonable time period. Here is the order that I would use:
1. Try the high pressure setting on your hose. If all the paint blasts right off polish the boat and go sailing. ( I will not suggest trying the local car wash because that would constitute
illegal pollution. I have heard rumors that some people have had success with that sort of thing.)
2. Try sanding the boat with a good old half sheet vibrating sander. For about $100 you can get a sander that will even collect the dust. For about $250 you can get a really good half sheet sander like the Porter Cable tool that we used in our
boat shop for the last 20 years. The sanders just seemed to run forever but you are only sanding one boat. If you do buy a cheap sander,
make sure you buy a set of $10 hearing muffs. Those cheap sanders vibrate and make your hands itch and they are loud.
Using the half sheet sander, try some 320 paper and see if you can remove the paint in a reasonable period of time. Work on a square foot and do the math to guess your time.
Important trick: If your goal is to restore the original finish, do not attempt to remove 100% of the paint with the roughest grit. If you
start with 180 paper, sand until you begin to see through the paint and then go after the rest of the paint with 240 or 320. If your plan is to repaint the boat, grab some 80 grit and prepare the surface on the first try. I am going to continue this note assuming that restoration is the goal.
3. You are going to have to use sandpaper held I your fingers to get all the paint off the inside of the gunwales. pay attention to the edge of the sandpaper that is leaning against the hull. It is very difficult to sand the paint off the inside of the gunwale without accidentally sanding through the gelcoat
about one inch up on the side of the hull. Pay attention and don't make this mistake. One helpful method is to cut the sheets of sandpaper to various sizes instead of always using 1/4 or 1/2 sheet. This method helps to vary the place where the edge of the paper digs into the adjacent surface.
4. Read "How to make your bottom pretty" and it will take you from the removed paint level to the shiny boat.
5. Last thing. You asked about applying gelcoat. Gelcoat is heavy and thick and not
particularly suited for refinishing. If you want to have a re-gel coated Laser that is also a good Laser you need to have a number of skills. You need to be
able to remove all the old gelcoat without harming the laminate or gouging the boat. you need to understand how to mix and apply the new gelcoat. You need to have a place to spray the messy substance and the equipment for application. You need to
apply a sealer to help the gelcoat cure. You need to sand the gelcoat to reestablish a smooth shiny surface. You need to accomplish the sanding and polishing without sanding through the gelcoat or you also need to understand how to gelcoat and blend
small areas with out leaving a patched look.
If you are going to repaint a Laser and you are not a really terrific gelcoat technician, I would always suggest painting the boat with a two package urethane paint. ( I usually suggest Interthane Plus sold by Courtaliads )
Good luck
Fred Schroth
Maintenance Page Index
Rebuilding an Old Laser - by Allan Broadribb
It all started on Tuesday, November 14. I'd got up, put on the coffee and, while it was
brewing, I strolled down the driveway to pick up the newspaper, The Sarasota Herald
Tribune.
So there I was, sitting in the kitchen, scanning the news and
drinking fresh coffee. Got through the comics then checked the classified ads to see if
there were any 65/66 Mustangs for sale, real cheap, and then the sailboats for sale.
There it was "Laser for sale on trailer $400 firm ..." What do I do? I could use
a trailer and the boat might not be dog meat. But... I've already got three sailboards in
the garage, a two year old Laser and a 21 foot power boat, not sure that Jocelyne thinks
we need another boat!
"Humph, I see there's a Laser for sale here for $400 and it's on a trailer" I
said, kind of optimistically. "So why don't you buy it, you'll get that back in
charters this winter" was the reply (am I lucky to have a wife so understanding!).
I grabbed the phone, it was about 9 am, if this was any good it wasn't going to be around
long. No it wasn't sold, got directions, jumped in the car and got there in 15 minutes. It
was still there, not sold.
The hull was blue, faded and chalky from the sun with an off white deck. There were the
three spars tied down on the deck, the trailer was kind of rusty and the tires were
crackly all over. But the boat wasn't in bad shape at first glance, a few scratches, no
holes.
Let's do this right, I thought, check the transom number, there wasn't one, so it was an
old boat. Check under the bow eye for the sail number, looks like 1416, yup it's old
alright, probably 72 or 73. Check the spars, they're all straight. Check the deck, it's
stiff, really stiff, no kidding, no soft spots anywhere, great.
As I'm doing this the owner comes out. "Know anything about Lasers? he says.
"Yeah, I've already got one. You want $400?" "Firm" he replies.
"I'll take it". So we go into his office where I write a check and he gives me
the title and trailer papers while telling me how he's too old for a small boat. I figure
I'd better not tell him about masters sailing or he won't sell it! I also got the mahogany
board and tiller, all the original lines that came with the boat and... wait for it... an
Elvstrom sail... didn't even have sail numbers on it.
We thanked each other, shook hands and I took off with the gear to get a trailer hitch put
on the wagon.
An hour later I was back for the boat and had a big decision to make. The trailer wheel
bearings were an unknown factor, do I head straight up I-75 at 60 mph or go across town
slowly in the traffic? What the heck... I took the highway and was home in 15 minutes with
my new toy.
The rest of that day was spent taking off all the fittings, washing it off, rubbing down
the hull with rubbing compound then waxing it. Apart from some elbow grease a bunch of new
fittings and lines the only major problem was that water came out of the bottom of the
mast step nearly as fast as you could put it in the top. So we needed a little glass work.
Wednesday, the next day, I sent off for all the bits and pieces, which included three
inspection ports to enable me to glass in the mast step and through bolt all the fittings.
The rest of the day was spent sanding down the grab rails, centreboard and rudder and
getting on the first coat of varnish as they hung from trees outside the house. The
original rudder bolt was interesting, 1/8" diameter through a 1/4" diameter
bushing in the wood, no wonder they changed that. By the time they were lightly sanded and
had a second coat of varnish on the blades were starting to look great.
Thursday, the box of bits showed up, so I cut three holes for inspection ports with a jig
saw. Old blocks of Styrofoam flotation inside, nice and heavy from water absorption at the
edges, I knew I'd forgotten something, plastic water bottles for flotation. How do you get
big blocks of Styrofoam through a 6" diameter hole, you don't. You spend about two
hours with a saw inside the boat, working with one hand. By the time you're finished your
knuckles are in great shape from hitting the edge of the hole in the boat. That's enough
for that day apart from putting another coat of varnish on the woodwork.
Friday, I bought some more supplies, fiberglass mat and resin to fix the mast step, a
bunch of new stainless steel screws, nuts bolts and washers to screw down and
through bolt
all the fittings. Free advice... buy #10 x 1 1/2" screws and #10 x 2" bolts
& nuts. Generally speaking they're all too long, but who cares. If I'd have known
that, I'd have saved another trip to the store!
I'd put one inspection port by the mast step in order to fix it. It's a hoot trying to
clean it up and glass it with one hand. Nevertheless I managed it and did a decent job, if
I say so myself. The second port I'd put beside the centerboard slot in order to
through bolt the hiking strap and mainsheet block fitting, which is loaded in tension when
used. The third went on the deck under the tiller so I could through bolt the rudder
fittings and hiking strap fairleads.
You're probably asking yourself at this point what's taking me so long. Well there's other
work to do as well, what with Laser sailors phoning the office for information and me
having to tell them the story of fixing my new old boat. Then the weekend was loaded with
social functions. Friday evening the annual art auction for the Sarasota Sailing Squadron
Youth Sailing Program which made about $3000 for the juniors, alright. Saturday, I was
race committee for the club regatta and Sunday I was best man at the Commodore's wedding.
All relatively unimportant matters compared to fixing your boat, I know, but Jocelyne
likes this stuff, so I decided I should really go with her sooner than suffer extreme
physical pain, plus the fact she might not say yes when I want to buy another boat!
Monday, I finished up. All new fairleads, aluminum cleats, Harken cam cleats, new hiking
strap and a bunch of other stuff. Boy she looked really nice (the boat not Jocelyne!). I
guess it was that night we rented Free Willy, an entertaining film about a kid that
befriends a whale, everyday stuff. Anyway the kid liberates Willy the whale (which is
probably what they would have called the movie thirty years ago, so much for modern
marketing) and Willy gets a new lease on life. The point of all this is that I decided I
might call the boat Willy, although I'm still undecided because I'm old fashioned and
think boats should have female names. Apart from Willy, I like Simone de Boudoir, of
course Vinny the Blade isn't bad either. It's one or the other and I'm leaning toward
Simone.
So what's next... the trailer. The frames is solid but rusty, the tires are shot, the
rims are rusty, the springs are broken and there're no lights. Off we go to the trailer shop, new
rims are cheap so buy new ones with tires on, new springs, new lights, nothing you can't
fix with a credit card. By dark I'd hit the frame with a wire brush in the electric drill
to get off most of the rust, replaced the bearings, put the new springs on, replaced the
axle and got a couple of coats of spray paint on it. It looked a lot better. The
rest of my spare time that week went to making supports for the boat, and deck
supports to hold the spars and enable me to double deck my other boat on top.
One thing here, how do you cut the correct hull curve in a piece of wood. You look up how
to do it in Dick Tillman's "Laser Sailing for the 1990's". By Saturday morning
it was all done, 1416 looked really sharp, shiny blue hull sitting on a black trailer with
white wheels and maroon carpet adding.
What's left to do, go sail it. At the time of writing I haven't done
this yet, but I'll do so soon.
copyright A.Broadribb
Maintenance Page Index
Repairing
the Bailer
Below you will see a really
bad drawing of a bailer chute and the bailer housing. There is no pivoting foot
piece because, I left out the parts I don't care about for this article.
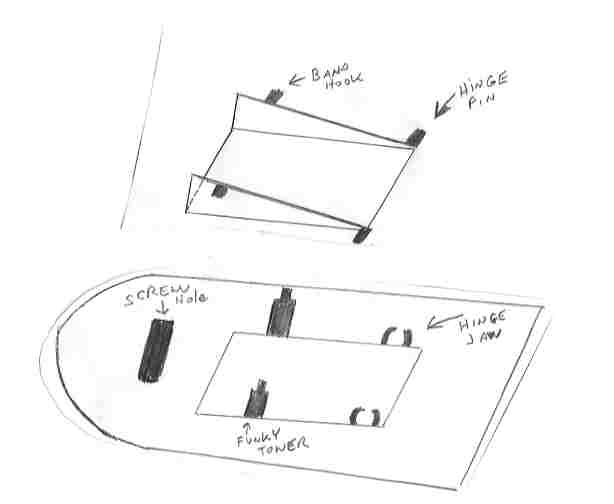
The "hinge pins" snap into
the "hinge jaws." The two rubber rings hook over the "band hooks" and the
"funky towers."
The screw hole is the
shaft through which the single attachment screw slides. If you don't like
my drawing, send me another pone that is more easy to understand and I will post
it!!.
If you are repairing your
bailer because you pushed the chute out of position... (Usually accomplished by
backing the boat off the trailer with the bailer chute open) Take an
extra few seconds to closely inspect the hinge jaws. Sometimes, forcing the
hinges out of the jaws cracks those jaws and the bailer will fall apart easily
unless you purchase an entire new assembly.
Another way of determining
whether you need a new base plate is by checking how easily the hinges snap back
together. if it is really simple to push the pins into the jaws, the pins
will also come out easily..
Also, the rubber bands pull
pretty hard. If the chute keeps snapping out and flying across the dock,
either you didn't fully seat the hinges or the jaws are broken.
The real truth about the
bailer? They can last forever!!! Keep the rubber bands in good order and
ALWAYS look one extra time to MAKE CERTAIN the chute has closed before sliding
your boat backwards.
I keep my boat on a dock
most of the time and I am usually in a big hurry to get off that dock and go
make it to the race on time. I buy lots of new chutes, a few new housings
and I have a big envelope of rubber rings.
Last? You cannot seal
the screw with too much silicone. If your boat leaks around the bailer
screw, it will leak every time you go sailing.
Remember:
Silicone does not stick to dirt, water or waxed surfaces (unless you don't want
it to in which case it will stick to the most expensive surface it can screw
up...like your dock, then your butt and then your Mom's car seats)
Maintenance Page Index
Straightening a Bent Centerboard or Rudder
Laser centerboards and rudders
built since the mid seventies are made from structural foam. They have thin
steel rods running vertically in the thicker part of the foil and a coat of some
sort of cheap enamel over the yellow brown colored foam.
The foam is pretty stiff and relatively strong until the
temperature of the blade rises to "ouch that's too hot to touch." Damage
to the foam structure (melting and bubbling) happens about fifty degrees
hotter than "ouch."
You must understand the above description to safely fix
your bent blades.
I will restate:
a. The blade can be damaged by making it too hot. I
don't know how hot and don't need to know. EXCEPT...I sure don't want to damage
the blade by overheating it.
b. The blade becomes soft and pliable somewhere around
the temperature where I can't stand to touch it.
c. There is a safe working range between too hot to
touch and burning the blade. I must work in that temperature range
Once more .... If I want to
bend my blade to a new shape I must get it hot enough to make it pliable and
absolutely not make it much hotter than that.
I will get it hot. I will bend it to
where I want it and then cool it off while I keep it where I want it.
The actual process is amazingly simple. My first try
was accomplished on the floor of the Carolina Yacht Club clubhouse and it took
about 20 minutes to make my horribly bent blades perfect.
1. I went to the local store and bought a $10 Proctor
Silex iron. I also bought a half yard remnant of COTTON material that was
tightly woven like a bedsheet.
2. I gathered my bent blade, the iron, the sheet and a
friend to watch.
3. I sat down on the floor by an electrical outlet and
unwrapped the new iron.
4. I placed the centerboard leading edge down between my
extended legs.
5. I hung the sheet over the trailing edge of the
centerboard
6. I ran the iron over each side of the cloth and then
touched the blade.
7. I repeated #6 a lot of times until the blade actually
warmed up.
This part is probably very important: I tried from the
very start to think about making the heat PENETRATE through the blade. I thought
about slow heating and thorough heating so that I would have a pliable blade not
just on the surface but well inside the blade. I worried that if I started
bending when only the surface was warm enough to bend, the inside part may not
be warm enough yet. The stiff part may be very thin and hard pushing might just
break that thin layer and my blade would be permanently weakened.
So, I took my time and didn't even THINK about bending the
blade until it had been really warm for a long time.
I am not a patient person. A long time is probably four or
five minutes.
8. I noticed the blade was bending a bit when I pushed
about three pounds of pressure sideways with the iron.
9. I pushed the blade just a bit past where I wanted it
and let go.
10. I lifted the sheet off and viewed my board to see how
I was doing.
11. I decided I was gaining on the problem.
12. I threw the sheet on and tried heating and pushing the
blade until the entire trailing edge was quite pliable.
13. I held the trailing edge against the flat uncarpeted
floor. (The leading edge was probably about six inches off the floor.)
14. I observed my progress and reheated and tried again
until the board was so perfect I couldn't figure out how else I could possibly
make it better.
Total time on the clubhouse floor?? I doubt it took
20 minutes.
Since that experience I have carried the iron and cloth
with me to almost every regatta and I have probably used it or loaned it to
straighten out a dozen bent blades.
The difference between you doing it and me doing it??
I heard it was possible to use an iron. You read a complete account of how
somebody else did it. Trust yourself. You can do it.
Maintenance Page Index
Pronunciation
guide: Americanized Schroth rhymes with both. Original German Schroth rhymes
with boat
Home Page
